Understanding Kubernetes Controllers
We will go through different types of controllers: Replication Controllers, ReplicaSet, Deployments. We also see how some operation tasks like autoscaling or rolling updates can be achieved using Kubernetes.
Replication Controllers
They supervise that a number of pods are up and available across all your nodes. On failures pod are replaced by new ones instead of trying to run new ones. You can declare these controllers in YAML files where we specify the image and the number of replicas desired.
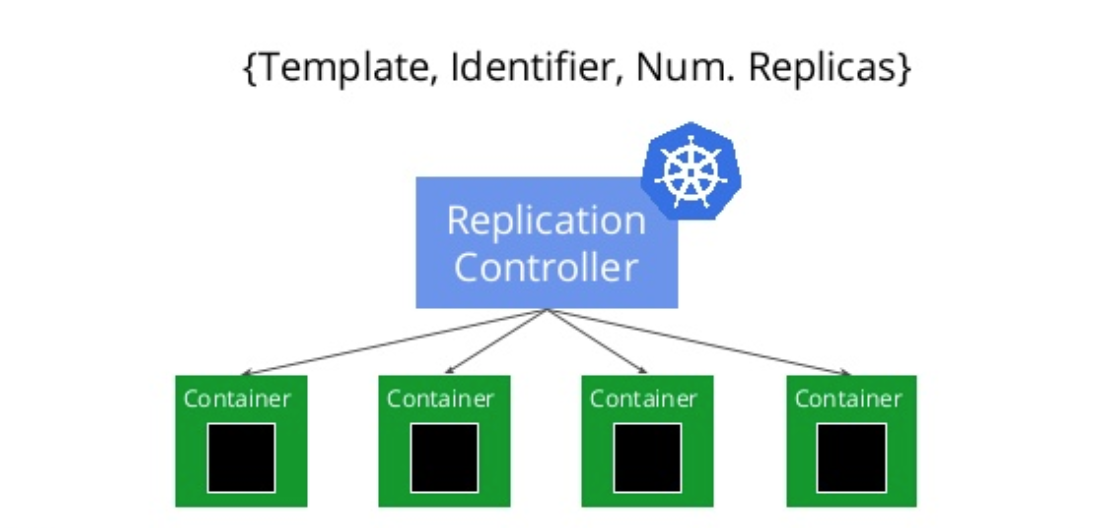
Let’s create a Replication controller file (busybox.yml ) to spin up a set of busybox containers.
apiVersion: v1
kind: ReplicationController
metadata:
  name: busybox
spec:
  replicas: 4
  selector:
    app: busybox
  template:
    metadata:
      name: busybox
      labels:
        app: busybox
    spec:
      containers:
      - name: busybox
        image: busybox
        command: [ "/bin/sh", "-c" ]
        args: [ "while true; do sleep 30; done;" ]
In this file we are specifying that the controller should ensure that 4 containers are runnung at every time. Note that I added a command to keep the busybox container alive forever. This is clearly an anti-pattern, but used for simplicity. Every pod will be labeled with the label “busybox” so later we can query K8 which are the pods attached to a certain label.
If you read my post 3. Understanding Kubernetes pods. you can see that the template section is exactly the same that we used when defining a pod descriptor.
» kubectl create -f ./busybox.yml
replicationcontroller "busybox" created
Once we create a controller, some time is required to provision and download the images for the pods you want to supervise before they start running.
» kubectl describe replicationcontrollers/busybox
Name:		busybox
Namespace:	default
Selector:	app=busybox
Labels:		app=busybox
Annotations:	<none>
Replicas:	4 current / 4 desired
Pods Status:	4 Running / 0 Waiting / 0 Succeeded / 0 Failed
Pod Template:
  Labels:	app=busybox
  Containers:
   busybox:
    Image:	busybox
    Port:
    Command:
      /bin/sh
      -c
    Args:
      while true; do sleep 30; done;
    Environment:	<none>
    Mounts:		<none>
  Volumes:		<none>
Events:
  FirstSeen	LastSeen	Count	From			SubObjectPath	Type		Reason			Message
  ---------	--------	-----	----			-------------	--------	------			-------
  30s		30s		1	replication-controller			Normal		SuccessfulCreate	Created pod: busybox-54sq9
  30s		30s		1	replication-controller			Normal		SuccessfulCreate	Created pod: busybox-ptgkc
  30s		30s		1	replication-controller			Normal		SuccessfulCreate	Created pod: busybox-fpnst
  30s		30s		1	replication-controller			Normal		SuccessfulCreate	Created pod: busybox-6fxjn
We can check if the controller is doing its job by killing one of the pods under supervision.
» kubectl delete pods busybox-6fxjn
pod "busybox-6fxjn" deleted
Tip: In occassion we may find that killing a rogue pod gives a headache so I recommend using the force flag to get rid of them with a gracefu period
» kubectl delete pods busybox-6fxjn --grace-period=0 --force
Theoretically the replication controller will try to spin up a new one in order to achieve the minimum threshold declared in the replicas section of our file, that was 4.
» kubectl describe replicationcontrollers/busybox | grep replication
  13m		13m		1	replication-controller			Normal		SuccessfulCreate	Created pod: busybox-54sq9
  13m		13m		1	replication-controller			Normal		SuccessfulCreate	Created pod: busybox-ptgkc
  13m		13m		1	replication-controller			Normal		SuccessfulCreate	Created pod: busybox-fpnst
  13m		13m		1	replication-controller			Normal		SuccessfulCreate	Created pod: busybox-6fxjn
  1m		1m		1	replication-controller			Normal		SuccessfulCreate	Created pod: busybox-v0qpq
The output may be a bit confusing as we see 5 pods. However the controller should not be able to see any longer the pod we killed (The second column indicates that busybox-v0qpq was Last seen 1 minute.
To be 100% sure we can see the pods attached by label. Remember we added the label “busybox” in our controller YAML file?
» kubectl get pods --selector=app=busybox --output=jsonpath={.items..metadata.name}
busybox-54sq9 busybox-fpnst busybox-ptgkc busybox-v0qpq%
So yes the pod we killed (busybox-6fxjn) now is dead and not under the supervision of the controller.
When working with controllers we may be interested on killing all the pods associated to a controller or just kill the controller and leave the pods running on its own under no supervision ( adding the –cascade flag = false). We will clean up everything, the controller and its pods.
» kubectl delete -f ./busybox.yml
replicationcontroller "busybox" deleted
» kubectl get pods --selector=app=busybox --output=jsonpath={.items..metadata.name}
The empty output means that there are no pods labeled with “busybox” any longer.
In the case you want to use more advanced patterns like Rolling Updates it needs to be done manually by creating a new Controllers and tweak the replica parameters accordingly ( decreasing in the old one and increasing in the new one). For a detailed understanding see (see Performing rolling updates)
That is the reason why K8 guides recommended a better approach using a Deployment descriptor targeting a ReplicaSet.
Replica Set Controllers
It´s nearly identical to the previous one but with better support for label set selectors. Once a ReplicaSet is in charge of a set of pods we can change the pod label so the ReplicaSet does not takes care of it of any longer.
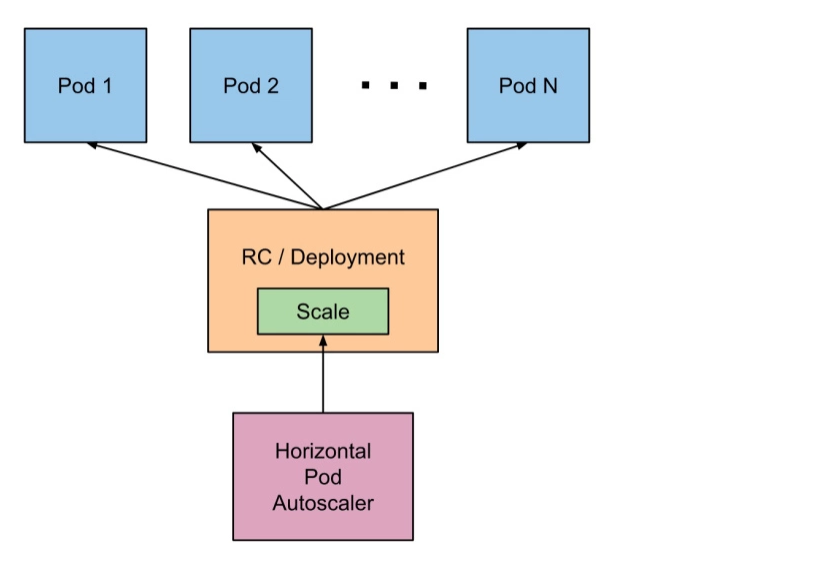
Autoscaling
Replication Controllers and Replica Set controller can be easily autoscaled based in several conditions. Autoscaling policies can be defined also in yaml files or can be applied on top of a resource to indicate minimum and maximum values of scaling when cpu conditions are reached within our k8 cluster.
We will continue using the previous example. So let´s create again our replicatoin controller. Using the previous example , just starting the controller created 4 pods.
» kubectl create -f ./busybox.yml
replicationcontroller "busybox" created
» kubectl get pods --selector=app=busybox --output=jsonpath={.items..metadata.name}
busybox-219d6 busybox-bv454 busybox-f5771 busybox-fg8hb
Let´s autoscale the controller between 7 and 10 when the target average CPU utilization (represented as a percent of requested CPU) is over 80%
» kubectl autoscale -f ./busybox.yml  --min=7 --max=10 --cpu-percent=80
» kubectl get pods --selector=app=busybox --output=jsonpath={.items..metadata.name}
busybox-219d6 busybox-bv454 busybox-f5771 busybox-fg8hb busybox-m1rrb busybox-mt698 busybox-zl1hm
In this case as the cpu % usage does not reach the limit the autoscaler does not need to add more container instnaces under its supervision.
Again the recommendation is to use Deployments instead of directly using ReplicaSets, unless you require custom update orchestration or don’t require updates at all.
Deployments
Our deployment descriptor looks like
apiVersion: apps/v1beta1
kind: Deployment
metadata:
  name: busybox
spec:
  replicas: 4
  selector:
    matchLabels:
      app: busybox
  template:
    metadata:
      name: busybox
      labels:
        app: busybox
    spec:
      containers:
      - name: busybox
        image: busybox
        command: [ "/bin/sh", "-c" ]
        args: [ "while true; do sleep 30; done;" ]
I run into multiple issues with my current version of minikube. I tried different apiVersions v1, apps/v1beta1 and apps/v1beta2 with no luck. Always getting the same error
» kubectl create -f ./busybox-deployment.yml
Error from server (BadRequest): error when creating "./busybox-deployment.yml": Deployment in version "v1beta2" cannot be handled as a Deployment: no kind "Deployment" is registered for version "apps/v1beta2"
The solution to the issue was Final solution was to restart my minikube cluster with a specific version.
» minikube start --kubernetes-version v1.6.0 --vm-driver=xhyve
» kubectl create -f ./busybox-deployment.yml --record
deployment "busybox" created
» kubectl get pods --selector=app=busybox
NAME                      READY   STATUS    RESTARTS   AGE
busybox-361166956-0wq7v  Running  1/1       0          1m
busybox-361166956-28lbj  Running  1/1       0          1m
busybox-361166956-6fn98  Running  1/1       0          1m
busybox-361166956-82z49  Running  1/1       0          1m
We can check the status of the existing Deployments
» kubectl get deployments
NAME      DESIRED   CURRENT   UP-TO-DATE   AVAILABLE   AGE
busybox   4         4         4            4           4m
» kubectl rollout status deployment/busybox
deployment "busybox" successfully rolled out
In the previous controller section we discussed about rolling updates and I mentioned that ReplicaSet supported that approach.
It can be accomplished with the following commands to be performed on top of a Deployment descriptor.
We are going to downgrade the busybox image to a previous version 1.27.1
Using the edit command we can access to a K8 enhanced version of our deployment file, kept in memory.
Locate the image section and update it
» kubectl edit deployment/busybox
deployment "busybox" edited
» kubectl rollout status deployment/busybox
Waiting for rollout to finish: 2 out of 4 new replicas have been updated...
Waiting for rollout to finish: 3 out of 4 new replicas have been updated...
Waiting for rollout to finish: 3 out of 4 new replicas have been updated...
Waiting for rollout to finish: 3 out of 4 new replicas have been updated...
Waiting for rollout to finish: 3 out of 4 new replicas have been updated...
Waiting for rollout to finish: 1 old replicas are pending termination...
Waiting for rollout to finish: 1 old replicas are pending termination...
Waiting for rollout to finish: 1 old replicas are pending termination...
deployment "busybox" successfully rolled out
To verify the change we can inspect the Deployment
» kubectl describe deployments
Name:			busybox
Namespace:		default
CreationTimestamp:	Mon, 04 Dec 2017 07:13:59 +0100
Labels:			app=busybox
Annotations:		deployment.kubernetes.io/revision=2
Selector:		app=busybox
Replicas:		4 desired | 4 updated | 4 total | 4 available | 0 unavailable
StrategyType:		RollingUpdate
MinReadySeconds:	0
RollingUpdateStrategy:	25% max unavailable, 25% max surge
Pod Template:
  Labels:	app=busybox
  Containers:
   busybox:
    Image:	busybox:1.27.1
    .........................
    ..........................
Other useful commands that we may be interested in learning would be being able to undo a rollout change ( in case our deployment went wrong).
» kubectl rollout undo deployment/busybox
deployments "busybox" rolled back
In case of doubt we can look to the history of commands performed to know which is the set of changes happened to a deployment
» kubectl rollout history deployment/busybox
deployments "busybox"
REVISION	CHANGE-CAUSE
1		kubectl create --filename=busybox-deployment.yml --record=true
2		kubectl edit deployment/busybox
Deployments can also scaled, or we can use proportional scaling, but I will let the reader find out how to do it.
Other controller types. Jobs and Daemon Sets
Jobs are used for batch jobs where we want to control whether or not the completion status. Jobs can be comprised of multiple paralell execution and we can specify a backoff limit so the Job knows that all its pods terminated doing its work. Once every pod has finished and the job limit is reached we can consider that the Job itself is complete.
Daemon Sets are used for long lifetime pods related with the nodes itself. Examples can be monitoring a cluster or agregating logs from different containers living in the cluster nodes.