Deploying Micronaut microservices into Kubernetes (Part III)
This post will show steps to deploy microservices into Kubernetes. We will use our previous Beer + Micronaut framework microservices examples so I recommend catching up with previous articles.
Why K8 again?
A year ago I started exploring concepts about Kubernetes (K8 from now on) in order to get some understanding about how things works but I had the feeling that I never played enough with multiple pods, connectivity,etc so I would like to learn/experiment a few things while I get more used to K8 commands & concepts. I will continue using our awesome beers bar implemented with Micronaut. You can catch up with previous blog entries Building microservices with Micronaut(I) and Building microservices with Micronaut(II)
POC Objectives
The objectives I would like to go through are :
- Dockerize all our Micronaut services so we can deploy them in a K8 cluster using minikube
- Get familiar with kubectl and its commands to deploy, change and monitor status of my pods.
- Explore and understand what Helm is.
- Dwelve deeper on deployment configurations to understand different kubernetes network modes and its impact on topology. Understand difference between Deployments and Services and how to access to Services via Ingress controllers.
- Understand (if required) Micronaut configuration changes when switching into from local enviroment into a K8 cluster environment
Preparing your Kubernetes environment
The following steps will guide throug a quick setup to install minikube and kubectl (K8 client) on a mac to interact with a cluster in development mode.
Check your bios
Minikube requires that VT-x/AMD-v virtualization is enabled in BIOS. To check that this is enabled on OSX / macOS run:
sysctl -a | grep machdep.cpu.features | grep VMX
If there’s output, you’re good!
Reinstall minikube
$ brew cask install virtualbox
$ sudo rm -rf $HOME/.minikube
$ rm /usr/local/bin/minikube;

$ brew cask install minikube
#Output
11:28:12
==> Satisfying dependencies
All Formula dependencies satisfied.
==> Downloading https://storage.googleapis.com/minikube/releases/v0.28.2/minikube-darwin-amd64
Already downloaded: /Users/mfarache/Library/Caches/Homebrew/downloads/61553571787748f22a08ab89864d1c8c67278a027da7192f345e32b3e3644e08--minikube-darwin-amd64
==> Verifying SHA-256 checksum for Cask 'minikube'.
==> Installing Cask minikube
==> Linking Binary 'minikube-darwin-amd64' to '/usr/local/bin/minikube'.
🍺  minikube was successfully installed!
Install K8 client
kubectl will allow us to interact with our minikube cluster
curl -Lo kubectl https://storage.googleapis.com/kubernetes-release/release/v1.10.0/bin/darwin/amd64/kubectl && chmod +x kubectl && sudo mv kubectl /usr/local/bin/
Start minikube
$ minikube start --bootstrapper=localkube                   # Output

Starting local Kubernetes v1.10.0 cluster...
Starting VM...
Downloading Minikube ISO
 160.27 MB / 160.27 MB [============================================] 100.00% 0s
Getting VM IP address...
WARNING: The localkube bootstrapper is now deprecated and support for it
will be removed in a future release. Please consider switching to the kubeadm bootstrapper, which
is intended to replace the localkube bootstrapper. To disable this message, run
[minikube config set ShowBootstrapperDeprecationNotification false]
Moving files into cluster...
Downloading localkube binary
 173.54 MB / 173.54 MB [============================================] 100.00% 0s
 65 B / 65 B [======================================================] 100.00% 0s
Setting up certs...
Connecting to cluster...
Setting up kubeconfig...
Starting cluster components...
Kubectl is now configured to use the cluster.
Now that we have our shiny minikube up & running we just need to configure our client so it points to that cluster
kubectl config use-context minikube
Installing our Beer Bar components into K8
As I explained in the introduction I will continue using the beers examples from previous posts Building microservices with Micronaut(I) and Building microservices with Micronaut(II)
I will build docker images for the waiter and billing micro-service, deploy them to K8 together with the other components required for the whole solution, i.e Consul and Zipkin.
One of my targets was exploring the behaviour configuring different types of services like PortForward, LoadBalancer and ClusterIp trying to explain the differences.
Hopefully on each section we will see different networking behaviour and learn how can we access to our services depending on such configuration.
If we have time I will like to explore working with ingress controller which is a plugin available in minikube.
Using Helm to Deploying Consul in K8
If you remember from previous posts Building microservices with Micronaut(I) and Building microservices with Micronaut(II) there are several components that were required in order to provide several cross concern capablities to our services.
Service Discovery/Registry was enabled via Consul.
It turned out that installing consul in K8 is way,way harder thing that I thought. It requires generation of certs, Consul Gossip Encryption Keys,Consul Secret and Configmaps, which are things I’m not really comfortable with so I will leave that to experts as homeworks ;)
If anyone fancy going that route, there is an awesome tutorial from one of the K8 gurus (Kelsey Hightower). You can can find it Running Consul on Kubernetes
So I opted for an easier path using Helm.
For those not familiar with the K8 lingo , Helm uses charts which describe apps and provide repeatable and versionable application installations to be deployed in K8.
If you are familiar with Iac (Infrastructure as Code) tools like Puppet, Chef, Ansible or Terraform, I see Helm as a similar way of expressing our components architecture aimed to a K8 cluster.
Let’s install Helm first. Helm has 2 components: a client and Tiller which is a pod deployed into our K8 acting as control plane.
As you can imagine there is a decent amount of Helm charts on a public repo for you to enjoy. However I opted to use the one from Hashicorp which owns Consul, as it seemed better documented for a rookie like me.
$ brew install kubernetes-helm
$ helm init

$ git clone https://github.com/hashicorp/consul-helm.git
$ cd consul-helm
# Checkout a tagged version
$ git checkout v0.1.0
Let’s have a look to contents of the cloned directory so we can learn how Helm works and its structure.
Helm is made of a chart and bunch templates. We can define configuration values in a “values.yaml” file, so they are merged into the template to provide the final descriptors configuration of our chart once is deployed.
So the idea here is that instead of having a descriptor for let’s say a pod, a replicacontroller, a deployment or a service we have components that can be configured via templates & values to produce the same result.
In summary Helm enables packaging our deployments and those are configurable to our needs.
# Run Helm
$ helm install --name consul ./
# Output

NAME:   consul
LAST DEPLOYED: Tue Sep 18 18:23:45 2018
NAMESPACE: default
STATUS: DEPLOYED

RESOURCES:
==> v1/Service
NAME           TYPE       CLUSTER-IP      EXTERNAL-IP  PORT(S)                                                                  AGE
consul-dns     ClusterIP  10.105.142.16   <none>       53/TCP,53/UDP                                                            1s
consul-server  ClusterIP  None            <none>       8500/TCP,8301/TCP,8301/UDP,8302/TCP,8302/UDP,8300/TCP,8600/TCP,8600/UDP  1s
consul-ui      ClusterIP  10.101.110.149  <none>       80/TCP                                                                   1s

==> v1/DaemonSet
NAME    DESIRED  CURRENT  READY  UP-TO-DATE  AVAILABLE  NODE SELECTOR  AGE
consul  1        1        0      1           0          <none>         1s

==> v1/StatefulSet
NAME           DESIRED  CURRENT  AGE
consul-server  3        3        1s

==> v1beta1/PodDisruptionBudget
NAME           MIN AVAILABLE  MAX UNAVAILABLE  ALLOWED DISRUPTIONS  AGE
consul-server  N/A            0                0                    1s

==> v1/Pod(related)
NAME             READY  STATUS             RESTARTS  AGE
consul-7xxb6     0/1    ContainerCreating  0         1s
consul-server-0  0/1    Pending            0         1s
consul-server-1  0/1    Pending            0         1s
consul-server-2  0/1    Pending            0         1s

==> v1/ConfigMap
NAME                  DATA  AGE
consul-client-config  1     1s
consul-server-config  1     1s
And voila!, Helm has deployed some pods as we can see here:
$ kubectl get pods
#Output
NAME              READY     STATUS    RESTARTS   AGE
consul-7xxb6      0/1       Running   0          36s
consul-server-0   0/1       Running   0          36s
consul-server-1   0/1       Pending   0          36s
consul-server-2   0/1       Pending   0          36s
Let’s inspect our services
$ $ kubectl get svc
#Output

NAME            TYPE        CLUSTER-IP       EXTERNAL-IP   PORT(S)                                                                            AGE
consul-dns      ClusterIP   10.105.142.16    <none>        53/TCP,53/UDP                                                                      2m
consul-server   ClusterIP   None             <none>        8500/TCP,8301/TCP,8301/UDP,8302/TCP,8302/UDP,8300/TCP,8600/TCP,8600/UDP            2m
consul-ui       ClusterIP   10.101.110.149   <none>        80/TCP                                                                             2m
kubernetes      ClusterIP   10.96.0.1        <none>        443/TCP
We can observe several things:
The “consul-server” is a headless service. Reading K8 docs : In this case a cluster IP is not allocated and there is no load balancing or proxying done by the platform for them. How DNS is automatically configured depends on whether the service has selectors defined.
The other services “consul-dns” and “consul-ui” are configured with the default type ClusterIP. You can see the type of service is ClusterIP , which, as the name indicates exposes the service’s ClusterIP address internally to the Kubernetes cluster.
We need to do port-forwarding to access to the UI, because for security reasons direct access is not allowed in the Helm charts
$ kubectl port-forward consul-server-0 8500:8500
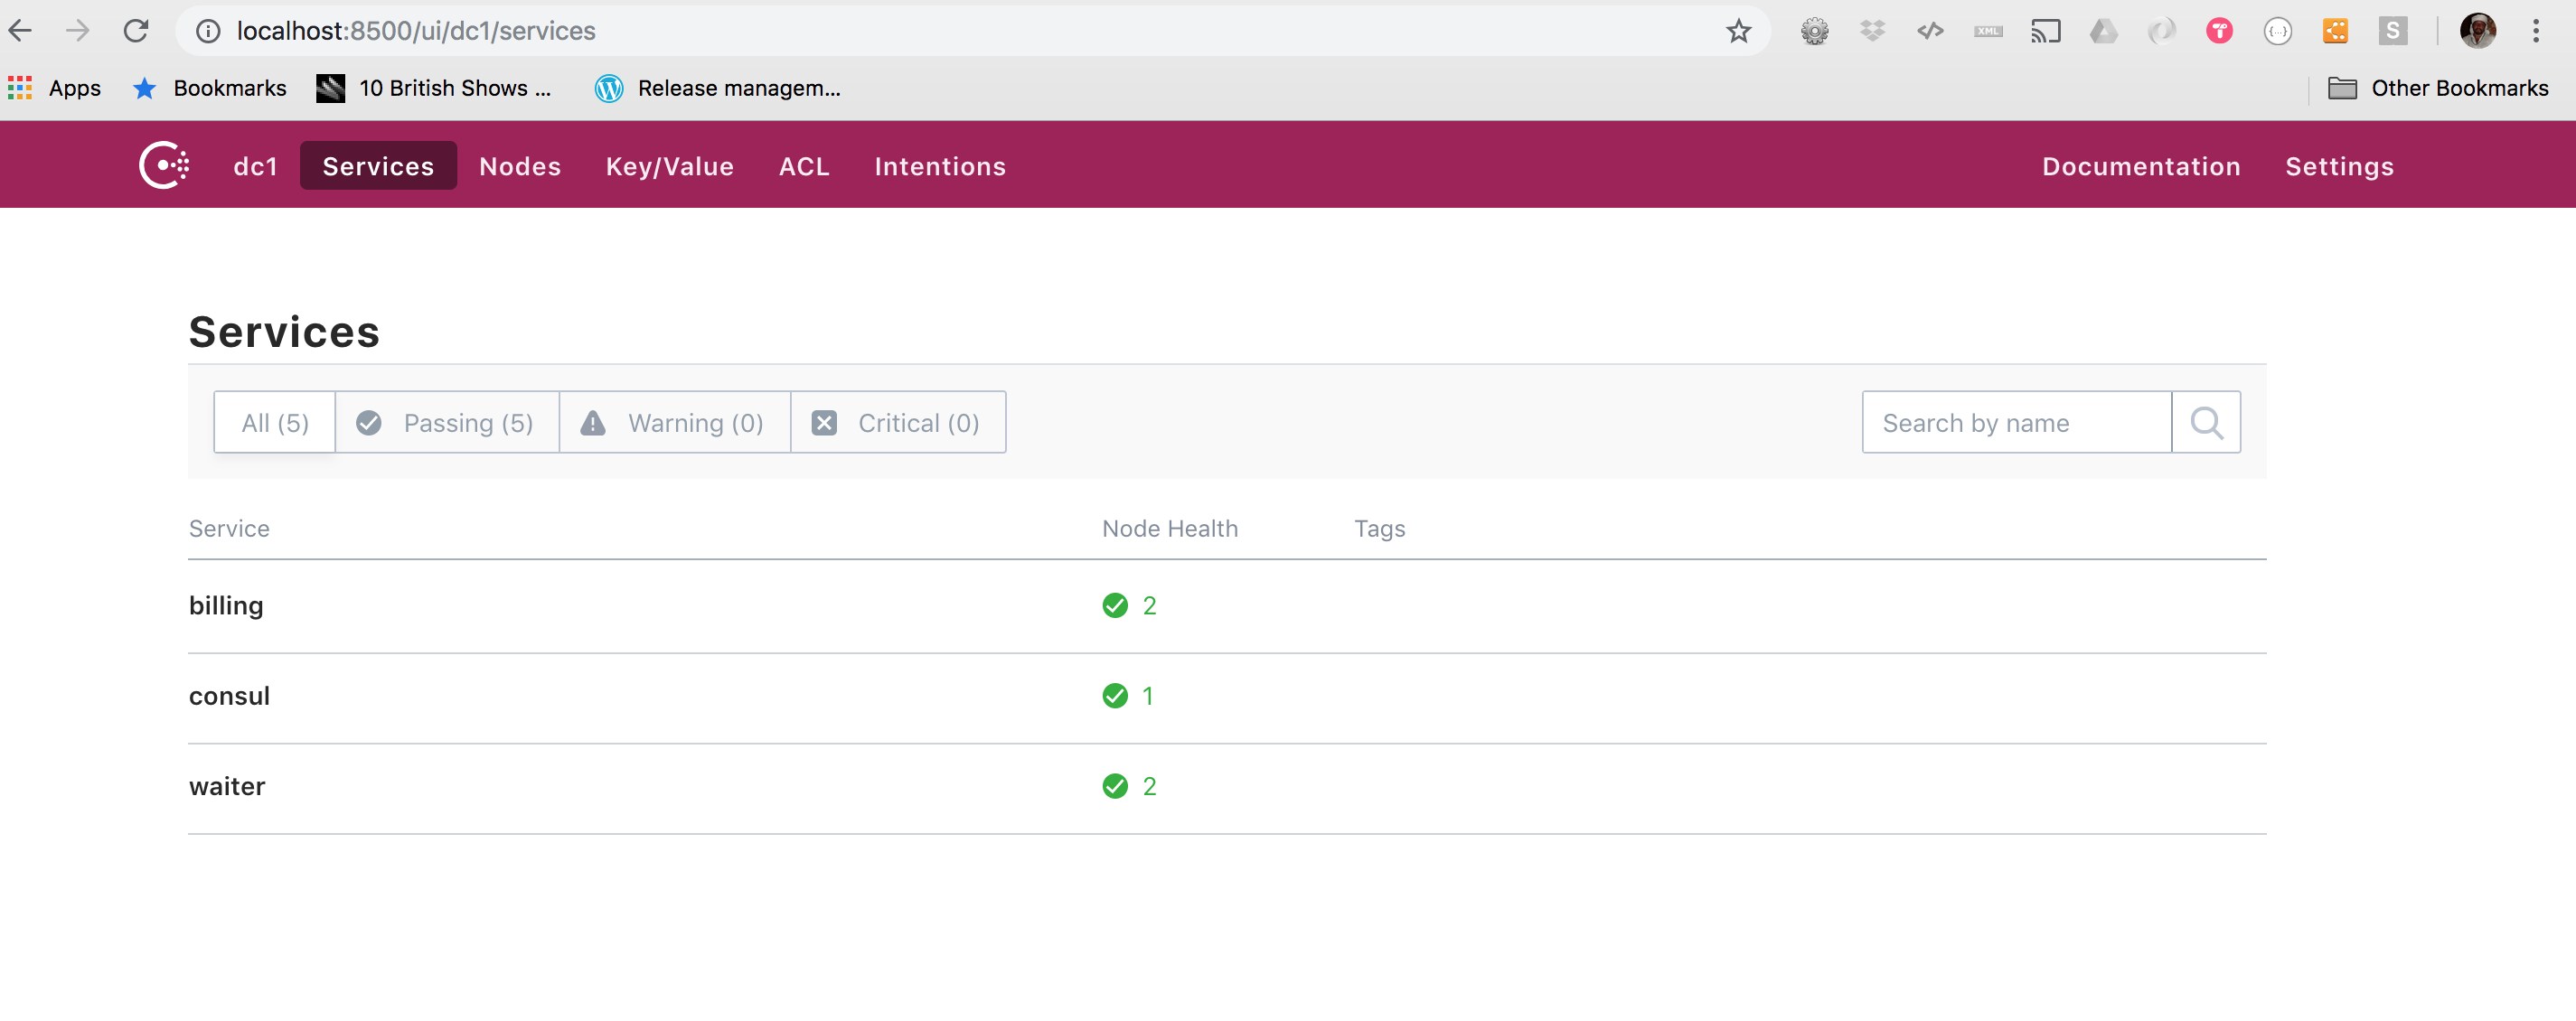
So if you followed the step you should be able to hit Consul console via this link http://localhost:8500/ui/dc1/services
Deploying Zipkin in K8 as Deployment file
I will try to run a minimal non-production Zipkin just running a pod with the zipkin image and then expose it as a service. You can deploy a pod directly or using a controller that takes care of it, but it is not the recommended way.
The source code now contains a new folder named k8 were I will place all my K8 files so they are easy to find.
We will first try to create a Deployment for a simple pod.
If I were to start independently I would launch a docker instance.
$ docker run -d -p 9411:9411 openzipkin/zipkin
We are not reallu running this, just I try to show the parameters so you can understand how this command can be easily translated into a K8 Deployment descriptot. Therefore my Deployment file “zipkin.yaml” needs to look like
apiVersion: apps/v1
kind: Deployment
metadata:
  name: zipkin-deployment
  labels:
    app: zipkin
spec:
  replicas: 1
  selector:
    matchLabels:
      app: zipkin
  template:
    metadata:
      labels:
        app: zipkin
    spec:
      containers:
      - name: zipkin
        image: openzipkin/zipkin:latest
        ports:
        - containerPort: 9411
We can deploy it in K8 with the apply command
$ kubectl apply -f zipkin.yml
Now Zipkin is running somewhere in the cluster but we cannot access to it directly.
The prefered approach is using a service that will give us a port to attach. The service provides an abstraction so a logical group of Pods can be seen together and therefore enable a way to access them.
We can create a service just by exposing the Deployment as a service using a command line
So we can match the port defined in Deployment file
$ kubectl expose deployment/zipkin-deployment --type="NodePort" --port 9411
The other alternative to achieve the same result would be using a service yaml descriptor, which is better as you may need to reprovision the service automatically or may need to change a port,etc.
For convenience I will just retrieve the service descriptor from the running service as we exposed in the previous step
kubectl get service  zipkin-deployment -o yaml --export
# output
apiVersion: v1
kind: Service
metadata:
  labels:
    app: zipkin
    name: zipkin-deployment
    selfLink: /api/v1/namespaces/default/services/zipkin-deployment
spec:
  externalTrafficPolicy: Cluster
  ports:
  - port: 9411
    protocol: TCP
    targetPort: 9411
  selector:
    app: zipkin
  sessionAffinity: None
  type: NodePort
Let’s now try to access to our Zipkin Console. Bear in mind that this time we have configured as type:NodePort.
In this case every node in our cluster will proxy that port into the service.
So we need to figure out which is the ip of our single node ( remember with minikube only one node is possible)
$ kubectl describe node minikube | grep IP
#output
InternalIP:  192.168.99.100
Inspecting the service we can see the assigned port is 30274
$ kubectl describe svc zipkin-deployment
#output
Name:                     zipkin-deployment
Namespace:                default
Labels:                   app=zipkin
Annotations:              kubectl.kubernetes.io/last-applied-configuration={"apiVersion":"v1","kind":"Service","metadata":{"annotations":{},"labels":{"app":"zipkin"},"name":"zipkin-deployment","namespace":"default"},"spec":{"e...
Selector:                 app=zipkin
Type:                     NodePort
IP:                       10.103.20.155
Port:                     <unset>  9411/TCP
TargetPort:               9411/TCP
NodePort:                 <unset>  30274/TCP
Endpoints:                172.17.0.38:9411
Session Affinity:         None
External Traffic Policy:  Cluster
Let’s hit then http://192.168.99.100:30274/zipkin/
Wohooo! We have Consul and Zipking running in our K8 cluster.
Deploying Beer Micronaut services in K8 as Deployment file
Theoretically now come the easier bits.. just deploying our Micronaut microservices. Should be a piece of cake right? let’s see..
First we need to create Docker images from our jar files. We will extend from a jdk 8 based on Alpine so the size is very small.
Now our source code contains a Dockerfile per microservice
FROM openjdk:8u171-alpine3.7
RUN apk --no-cache add curl
COPY target/waiter-0.0.1-SNAPSHOT.jar beer-billing.jar
CMD java ${JAVA_OPTS} -jar beer-billing.jar
FROM openjdk:8u171-alpine3.7
RUN apk --no-cache add curl
COPY target/billing-0.0.1-SNAPSHOT.jar beer-waiter.jar
CMD java ${JAVA_OPTS} -jar beer-waiter.jar
Now we can build and push our images to a registry so they can be pulled by K8 later
$ cd <ws>/beer-waiter
$ docker build -t beer-waiter .

$ cd <ws>/beer-billing
$ docker build -t beer-billing .
We will create 2 deployments, one for each microservice. We will need one billing and 3 waiters as our bar is getting trendy lately
See below each of them
The Beer Billing Deployment with a single instances
apiVersion: apps/v1
kind: Deployment
metadata:
  name: billing-deployment
  labels:
    app: billing
spec:
  replicas: 1
  selector:
    matchLabels:
      app: billing
  template:
    metadata:
      labels:
        app: billing
    spec:
      containers:
      - name: billing
        image: beer-billing:latest
        ports:
        - containerPort: 8083
$ kubectl apply -f billing.yaml
The Beer Waiter Deployment with 3 instances
apiVersion: apps/v1
kind: Deployment
metadata:
  name: waiter-deployment
  labels:
    app: waiter
spec:
  replicas: 3
  selector:
    matchLabels:
      app: waiter
  template:
    metadata:
      labels:
        app: waiter
    spec:
      containers:
      - name: waiter
        image: beer-waiter:latest
        ports:
        - containerPort: 8082
kubectl apply -f waiter.yaml
I modified slightly our original micronaut configuration files so each microservice runs in a specific port instead of a dinamic one. That way is easier to configure network access to it. You can check that entries port (containerPort) matches with the ones we have redefined in our Micronaut application.properties file
$ kubectl get pods
#Output
billing-deployment-6d8c765ffb-hxk4r   0/1       ErrImagePull       0          46s
consul-7xxb6                          0/1       Running            0          2d
consul-server-0                       0/1       Running            0          2d
consul-server-1                       0/1       Pending            0          2d
consul-server-2                       0/1       Pending            0          2d
waiter-deployment-568849f55b-cpd2s    0/1       ImagePullBackOff   0          54s
zipkin-deployment-5bf954f879-pnhgk    1/1       Running            0          1d
Uh-oh
What is going on? Well K8 is trying to download the image from the public DockerHub registry, however we only have built locally. So I pushed my images using my user profile
$ docker login
#Output
Login with your Docker ID to push and pull images from Docker Hub. If you don't have a Docker ID, head over to https://hub.docker.com to create one.
Username: xxxxxxxx
Password: ????????
Login Succeeded

$ docker tag beer-billing dockermau/beer-billing:1.0
$ docker push dockermau/beer-billing

$ docker tag beer-waiter dockermau/beer-waiter:1.0
$ docker push dockermau/beer-waiter
So once images have been tagged and pushed, we would be in a good position to try to deploy again
$ kubectl get pods
#Output
NAME                                  READY     STATUS             RESTARTS   AGE
billing-deployment-794d56b4c6-87vjc   0/1       CrashLoopBackOff   4          2m
consul-7xxb6                          0/1       Running            0          2d
consul-server-0                       0/1       Running            0          2d
consul-server-1                       0/1       Pending            0          2d
consul-server-2                       0/1       Pending            0          2d
waiter-deployment-5c9cb4d4cd-mqcxk    0/1       CrashLoopBackOff   3          2m
waiter-deployment-5c9cb4d4cd-whnqr    0/1       Error              3          2m
waiter-deployment-5c9cb4d4cd-z54x2    0/1       Error              3          2m
zipkin-deployment-5bf954f879-pnhgk    1/1       Running            0          2d
Ok, at least slightly different. Images have been pulled from the public registry. They are failing though… Now is where the fan starts as involves networking configuration ;)
Reconfiguring our services
If you are here continuing the series on micronaut entries, you will remember that both waiter and billing used Consul to register and discover services.
As an example Our Billing Micronaut application had these configuration files
micronaut.application.name=billing
micronaut.server.port=8083

consul.client.registration.enabled=true

consul.client.enabled=true
consul.client.config.enabled=true
consul.client.config.format=properties
consul.client.defaultZone=${CONSUL_HOST:localhost}:${CONSUL_PORT:8500}
And
micronaut:
    application:
        name: billing
    config-client:
        enabled: true
consul:
    client:
        defaultZone: "${CONSUL_HOST:localhost}:${CONSUL_PORT:8500}"
tracing:
  zipkin:
    enabled: true
    http:
      url: "http://${ZIPKIN_HOST:localhost}:${ZIPKIN_PORT:9411}"
      sampler:
        probability: 0.1
Let’s see logs in K8 for our waiter service
$ kubectl logs waiter-deployment-5c9cb4d4cd-mqcxk
#Output
.....
.....
11:25:42.260 [main] ERROR io.micronaut.runtime.Micronaut - Error starting Micronaut server: Error reading distributed configuration from Consul: Connect Error: Connection refused: localhost/127.0.0.1:8500
io.micronaut.context.exceptions.ConfigurationException: Error reading distributed configuration from Consul: Connect Error: Connection refused: localhost/127.0.0.1:8500
As we are not passing variables is taking the default configuration with localhost:8500. That values was correct when we were running locally our Consul as a docker instance. (See as I did in my post Building microservices with Micronaut(I)).
However in K8 world, where each microservice is a pod, it’s looking for Consul in the same instance, while Consul has been deployed as 3 different pods, one of them running the register services.
The problem we need to solve is then to make Consul and Zipkin visible to our microservices.
There are 2 main ways so our services can find another service.
One would be using environment variables, so we could extract the IP from our consul server
$ kubectl exec consul-server-0 -- printenv | grep KUBERNETES_SERVICE
#Output
KUBERNETES_SERVICE_HOST=10.96.0.1
KUBERNETES_SERVICE_PORT_HTTPS=443
KUBERNETES_SERVICE_PORT=443
Later we “could” modify our Waiter and Billing deployment descriptors. We “could” just add the environment variables required by our Micronaut services to find Consul server (CONSUL_HOST, CONSUL_PORT).
That approach might work… but only temporarily because is not repeatable. We cannot guarantee that K8 will assign the same IP to our Consul service on next deployment.
The more robust approach is using DNS, so just knowing the app name we assigned in the descriptor , other pods can see other services by resolution of the hostnames.
Let’s check if DNS plugin is running on our cluster
$ kubectl get services kube-dns --namespace=kube-system
NAME       TYPE        CLUSTER-IP   EXTERNAL-IP   PORT(S)         AGE
kube-dns   ClusterIP   10.96.0.10   <none>        53/UDP,53/TCP   17d
So now we can verify connection to one of the pods, if there is network connection with the consul server itself. I had some issues trying to create a interactive session with my pods due to minikube api-server not being fully working, so instead we can try this
$ kubectl run curl --image=radial/busyboxplus:curl -i --tty
#Output
If you don't see a command prompt, try pressing enter.
[ root@curl-775f9567b5-q5rww:/ ]$ nslookup consul-server
Server:    10.96.0.10
Address 1: 10.96.0.10 kube-dns.kube-system.svc.cluster.local

Name:      consul-server
Address 1: 172.17.0.3 consul-server-0.consul-server.default.svc.cluster.local

[ root@curl-775f9567b5-q5rww:/ ]$ nslookup zipkin-deployment
Server:    10.96.0.10
Address 1: 10.96.0.10 kube-dns.kube-system.svc.cluster.local

Name:      zipkin-deployment

$ exit
TIP: As you have left a running session, you can reattach later via this command
$ kubectl attach curl-775f9567b5-q5rww -c curl -i -t
We will change our K8 Deployment descriptors adding 2 variables
apiVersion: apps/v1
kind: Deployment
metadata:
  name: billing-deployment
  labels:
    app: billing
spec:
  replicas: 1
  selector:
    matchLabels:
      app: billing
  template:
    metadata:
      labels:
        app: billing
    spec:
      containers:
      - name: billing
        image: dockermau/beer-billing:1.0
        env:
        - name: CONSUL_HOST
          value: "consul-server"
        - name: ZIPKIN_HOST
          value: "zipkin-deployment"
        ports:
        - containerPort: 8083
Now we just reapply the new settings
$ kubectl apply -f waiter.yaml
$ kubectl apply -f billing.yaml
$ kubectl get pods
#Output
NAME                                 READY     STATUS    RESTARTS   AGE
billing-deployment-78bd8894f-6dccx   1/1       Running   1          1m
consul-7xxb6                         0/1       Running   1          17d
consul-server-0                      0/1       Running   1          17d
consul-server-1                      0/1       Pending   0          17d
consul-server-2                      0/1       Pending   0          17d
curl-775f9567b5-q5rww                1/1       Running   2          19h
waiter-deployment-65d46cbd4c-454hx   1/1       Running   2          1m
waiter-deployment-65d46cbd4c-7nwfh   1/1       Running   0          1m
waiter-deployment-65d46cbd4c-9ttpx   1/1       Running   2          1m
zipkin-deployment-5bf954f879-pnhgk   1/1       Running   1          17d
So everything seems up & running, however inspection of logs indicates that connection with Consul is not ok. Digging logs on consul itself shows that Leader elections was not possible
$ kubectl logs consul-server-0
#Output extract
2018/10/06 07:50:52 [ERR] agent: Coordinate update error: rpc error making call: No cluster leader
2018/10/06 07:51:09 [ERR] consul: "Catalog.NodeServices" RPC failed to server 172.17.0.3:8300: rpc error making call: No cluster leader
2018/10/06 07:51:09 [ERR] agent: failed to sync remote state: rpc error making call: No cluster leader
I’m using the helm chart from Hashicorp, but seems the issue appears also on the official helm chart repository when trying to run different Consul nodes because the pod generation id algorithm gives the same identifier.
https://github.com/helm/charts/issues/1289
As the intention of this post is not setting a real cluster, I will just modify the helm settings to use only one node instead of 3, therefore a quorum of single node would be enough for our exercise
# Go to the directory where we cloned Helm chart
cd consul-helm
# Modify values.yaml so
# server:
#  enabled: "-"
#  image: null
#  replicas: 1
#  bootstrapExpect: 1 # Should <= replicas count
#  storage: 10Gi

# Delete consul
$ helm del --purge consul
# Upgrade Helm so Consul is installed with only 1 server
$ helm install --name consul ./
Now logs on Consul seems fine!!!!
2018/10/06 08:14:13 [WARN] manager: No servers available
2018/10/06 08:14:13 [ERR] http: Request GET /v1/status/leader, error: No known Consul servers from=127.0.0.1:53268
2018/10/06 08:14:23 [WARN] manager: No servers available
2018/10/06 08:14:23 [ERR] agent: failed to sync remote state: No known Consul servers
2018/10/06 08:14:23 [WARN] manager: No servers available
2018/10/06 08:14:23 [ERR] http: Request GET /v1/status/leader, error: No known Consul servers from=127.0.0.1:53294
2018/10/06 08:14:28 [INFO] agent: (LAN) joining: [consul-server-0.consul-server.default.svc]
2018/10/06 08:14:29 [INFO] serf: EventMemberJoin: consul-server-0 172.17.0.5
2018/10/06 08:14:29 [INFO] agent: (LAN) joined: 1 Err: <nil>
2018/10/06 08:14:29 [INFO] agent: Join LAN completed. Synced with 1 initial agents
2018/10/06 08:14:29 [INFO] consul: adding server consul-server-0 (Addr: tcp/172.17.0.5:8300) (DC: dc1)
2018/10/06 08:14:29 [INFO] agent: Synced node info
We just need to redeploy our microservices again, as they are not designed to detect Consul behaving correctly. Service registration is done only on startup so we need to redeploy our services again.
$ kubectl delete deployment billing-deployment
$ kubectl delete deployment waiter-deployment
$ kubectl apply -f waiter.yaml
$ kubectl apply -f billing.yaml
If everything went well I would expect that my pods should be up & running with no restarts, meaning that they were able to register. As a consequence we should be able to see our services registered in Consul.
Remember to execute port forwarding before we access to Consul UI
$ kubectl port-forward consul-server-0 8500:8500
#hit UI console with browser
Also we can launch our K8 Dashboard
$ minikube dashboard
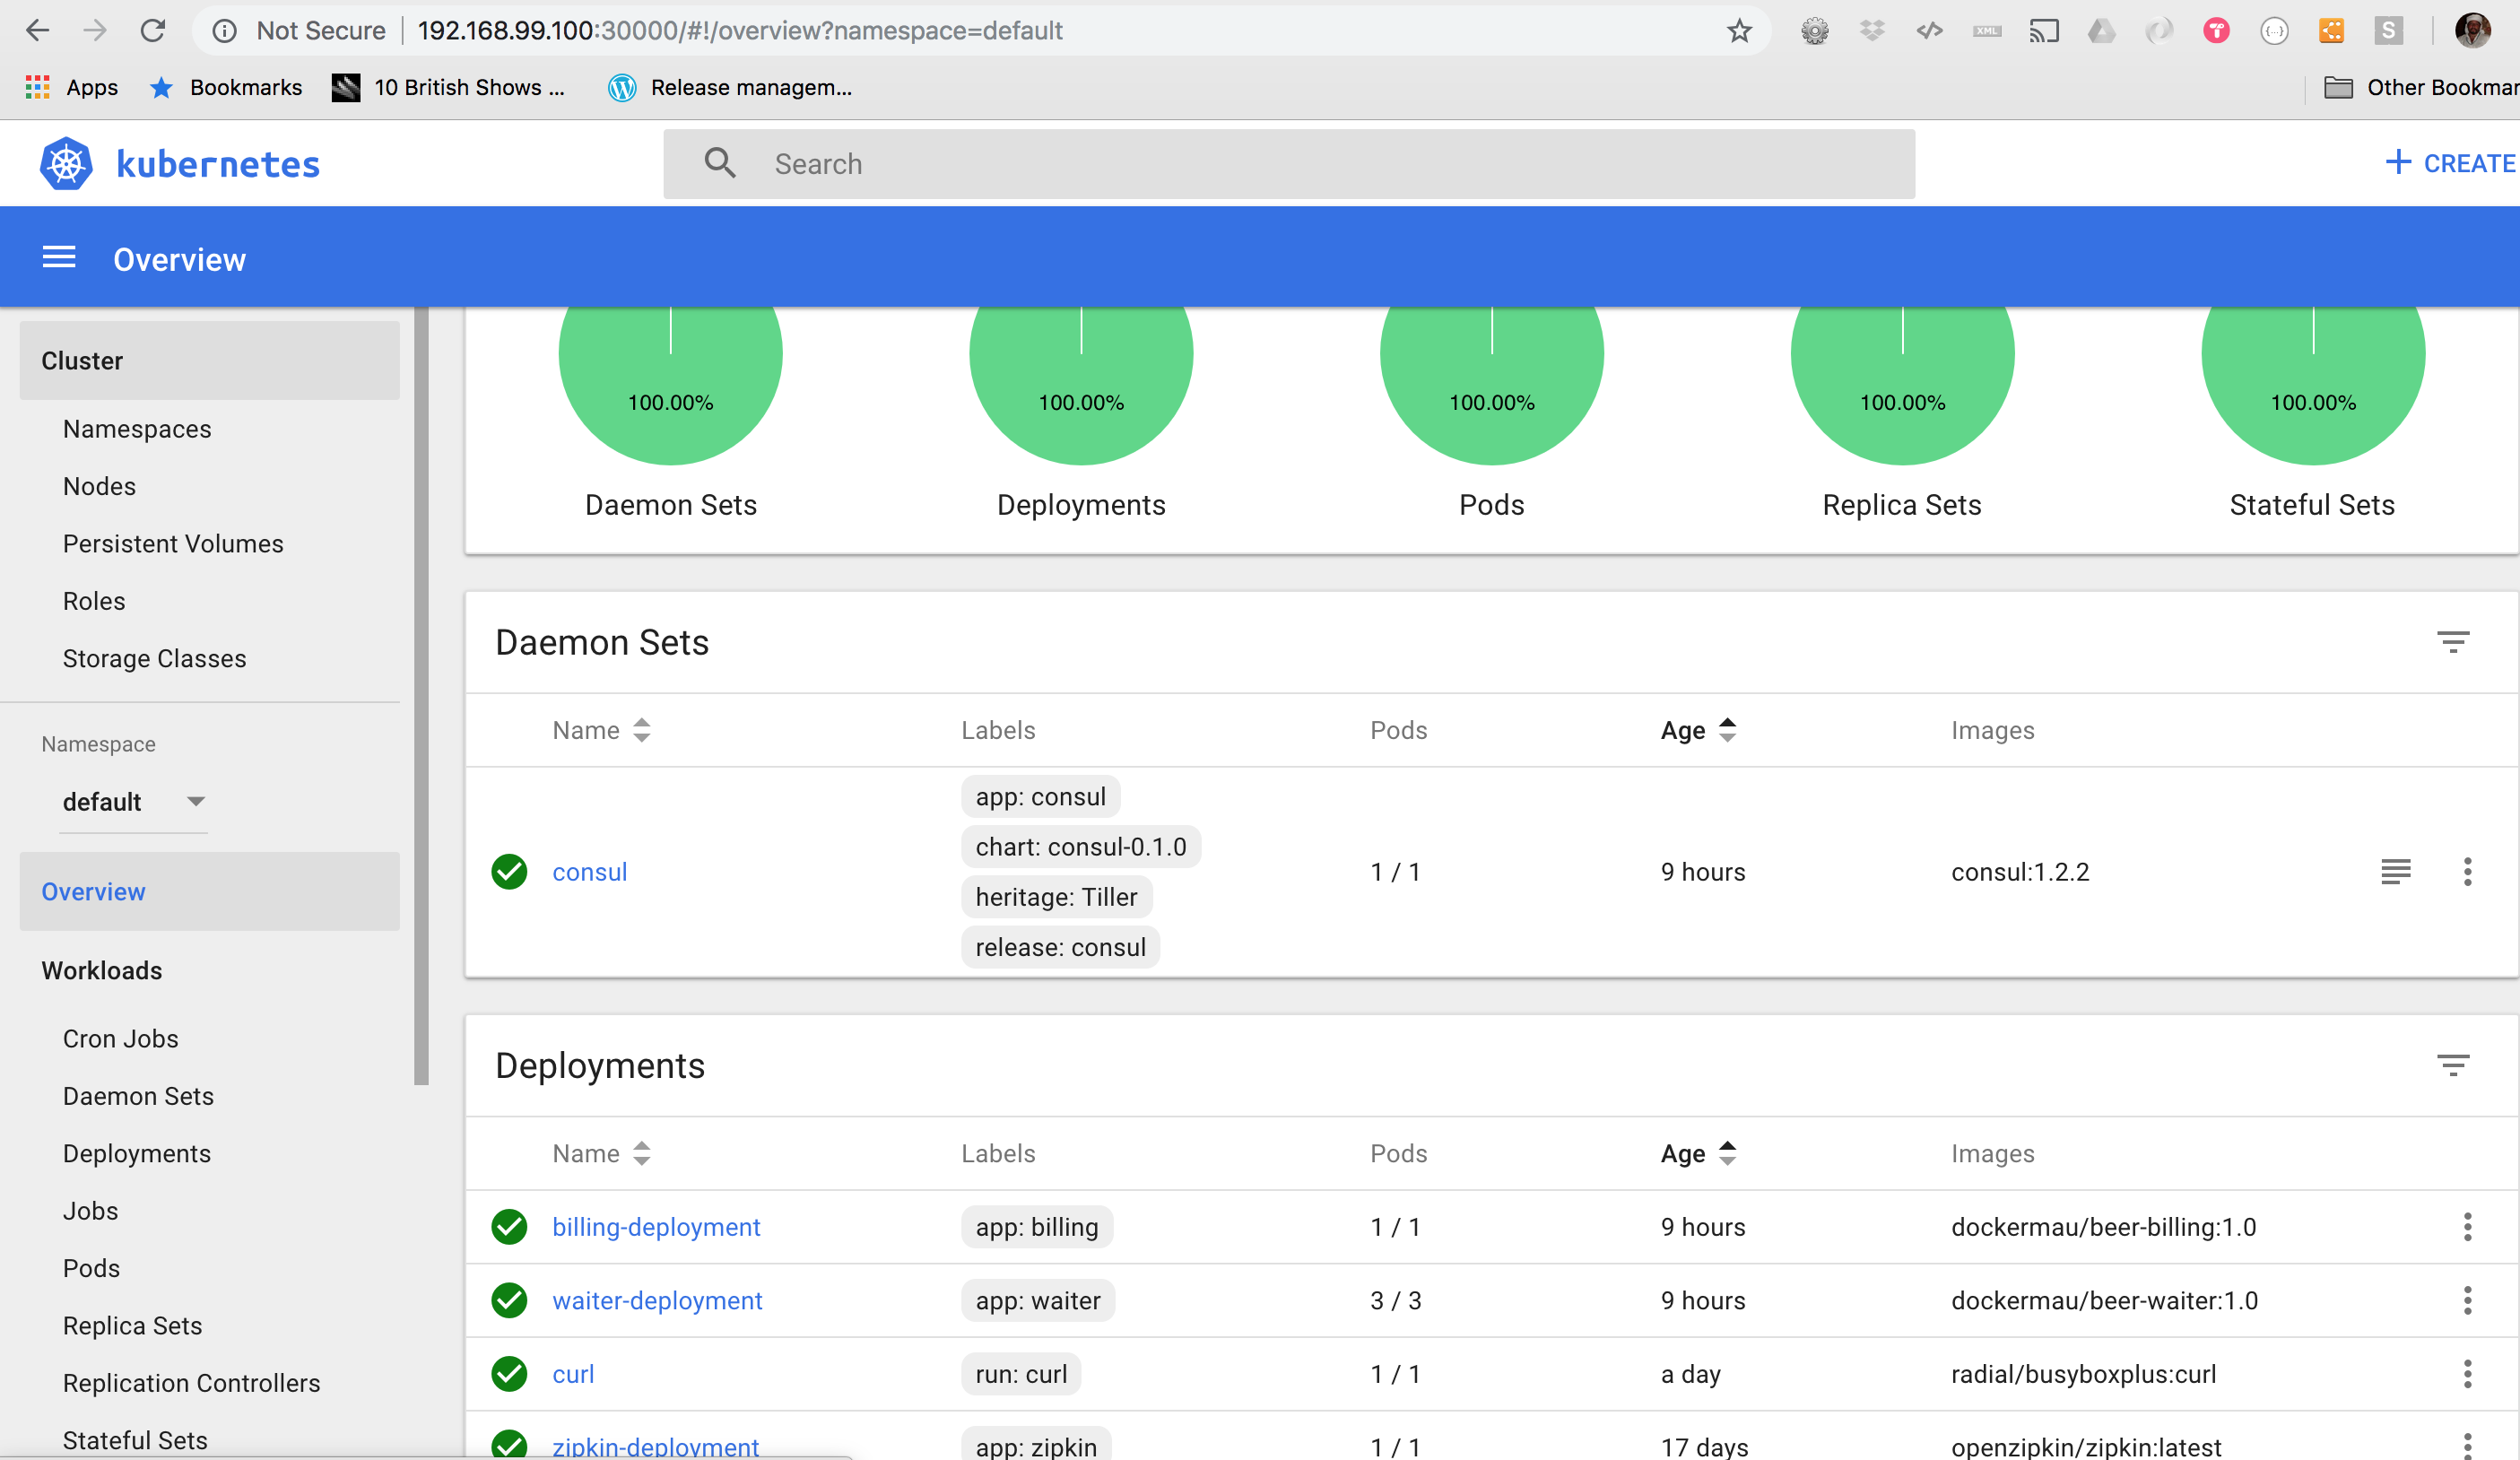
We can see that our K8 cluster state is healthy. Every components is up & running, the ones deployed via Helm and the ones deployed using Deployment descriptor. We can also notice that the deployment of Consul is quite convoluted and there are several components like Stateful sets, ReplicationControllers and Pods that were created automatically just by executing a single command.
This was a hell of a ride!!!
Let the people enjoy our beer bar!
Before we inaugurate our K8 Micronaut Beers bar to public we need to make sure out waiters and billing are available. You can imagine they live in a hermetically seiled box, so no one will be able to enter unless we do something.
We will let them in using a ingress controller? What is this?
By defining an ingress controller in our K8 cluster, we are just defining set of rules for routing external traffic to the kubernetes endpoints.
Luckily enough Minikube offer us a nginx ingress controller that will allow us to configure rules in a similar way we would do if we were using a nginx instance.There are different ingress controllers that could do the job using HaProxy is a valid alternative, however I will use the nginx one as is enabled by default in minikube
$ minikube addons enable ingress
So now any request will go through these components if there is a rule properly configured, otherwise will return some error.
Ingress > Service > Pods
First we will expose both Deployments as services. We will use the ports we configured in our micronaut application.
$ kubectl expose deployment/waiter-deployment --type="NodePort" --port 8082
#Output
service "waiter-deployment" exposed

$ kubectl expose deployment/billing-deployment --type="NodePort" --port 8083
#Output
service "billing-deployment" exposed
Second we need to define a ingress rule so requests are properly routed. As an example this would be the one for the billing service.
apiVersion: extensions/v1beta1
kind: Ingress
metadata:
  name: billing-ingress
  annotations:
    nginx.ingress.kubernetes.io/ssl-redirect: \"false\"
spec:
  rules:
  - http:
      paths:
        - path: /billing
          backend:
            serviceName: billing-deployment
            servicePort: 8083
We can verify was created correctly
$ kubectl describe ing billing-ingress
#Output
Name:             billing-ingress
Namespace:        default
Address:
Default backend:  default-http-backend:80 (172.17.0.13:8080)
Rules:
  Host  Path  Backends
  ----  ----  --------
  *
        /billing   billing-deployment:8083 (<none>)
Annotations:
  kubectl.kubernetes.io/last-applied-configuration:  {"apiVersion":"extensions/v1beta1","kind":"Ingress","metadata":{"annotations":{"nginx.ingress.kubernetes.io/ssl-redirect":"\\\"false\\\""},"name":"billing-ingress","namespace":"default"},"spec":{"rules":[{"http":{"paths":[{"backend":{"serviceName":"billing-deployment","servicePort":8083},"path":"/billing"}]}}]}}

  nginx.ingress.kubernetes.io/ssl-redirect:  \"false\"
Events:
  Type    Reason  Age               From                      Message
  ----    ------  ----              ----                      -------
  Normal  CREATE  29m               nginx-ingress-controller  Ingress default/billing-ingress
  Normal  UPDATE  8m (x3 over 28m)  nginx-ingress-controller  Ingress default/billing-ingress
So now we can access to our service using the cluster ip because our rule will be responsable of rerouting our request into our service with the correct port.
Source code has been updated with a new folder to keep all the K8 files and also the cloned Helm chart from Hashicorp with the modification related to single node instead of 3.