Improving acceptance testing using AWS CloudFormation, S3, Jenkins and Docker
I will describe how we improved our automation testing cycle using CloudFormation, S3, Jenkins and Docker.
Objective
As part of an agile approach, we always try to improve our practices. The next area of improvement is around automation testing. We run nightly a suite of acceptance tests run by Jenkins with Cucumber / Ruby so we get daily report about failed/passed scenarios & steps that we can track daily.
There are some obvious drawback though in the current approach
-
Execution time was nearly 4 hours. You will be wondering why? mainly the database we use is the same that has been running since months ago, with a lot of data on it, as result of multiple execution of automation tests.
-
We use the same machine that we use for development, so running of automation test impacts negatively to our daily work and we therefore postpone the launch of these tests to be run by night. This is not a good idea as ideally we want to have quick feedback if something is broken!
-
We use the same database, so the outcome of the tests could pollute our dev environment. To mitigate this we changed radically the approach of our tests so we always create the conditions in our database before the run are tests, execute the scenarios and eventually wipe out all data which was created as result of the test
-
We must have machines switched on the whole day, because tests are run by night, therefore our AWS bill costs could be less.
Solution
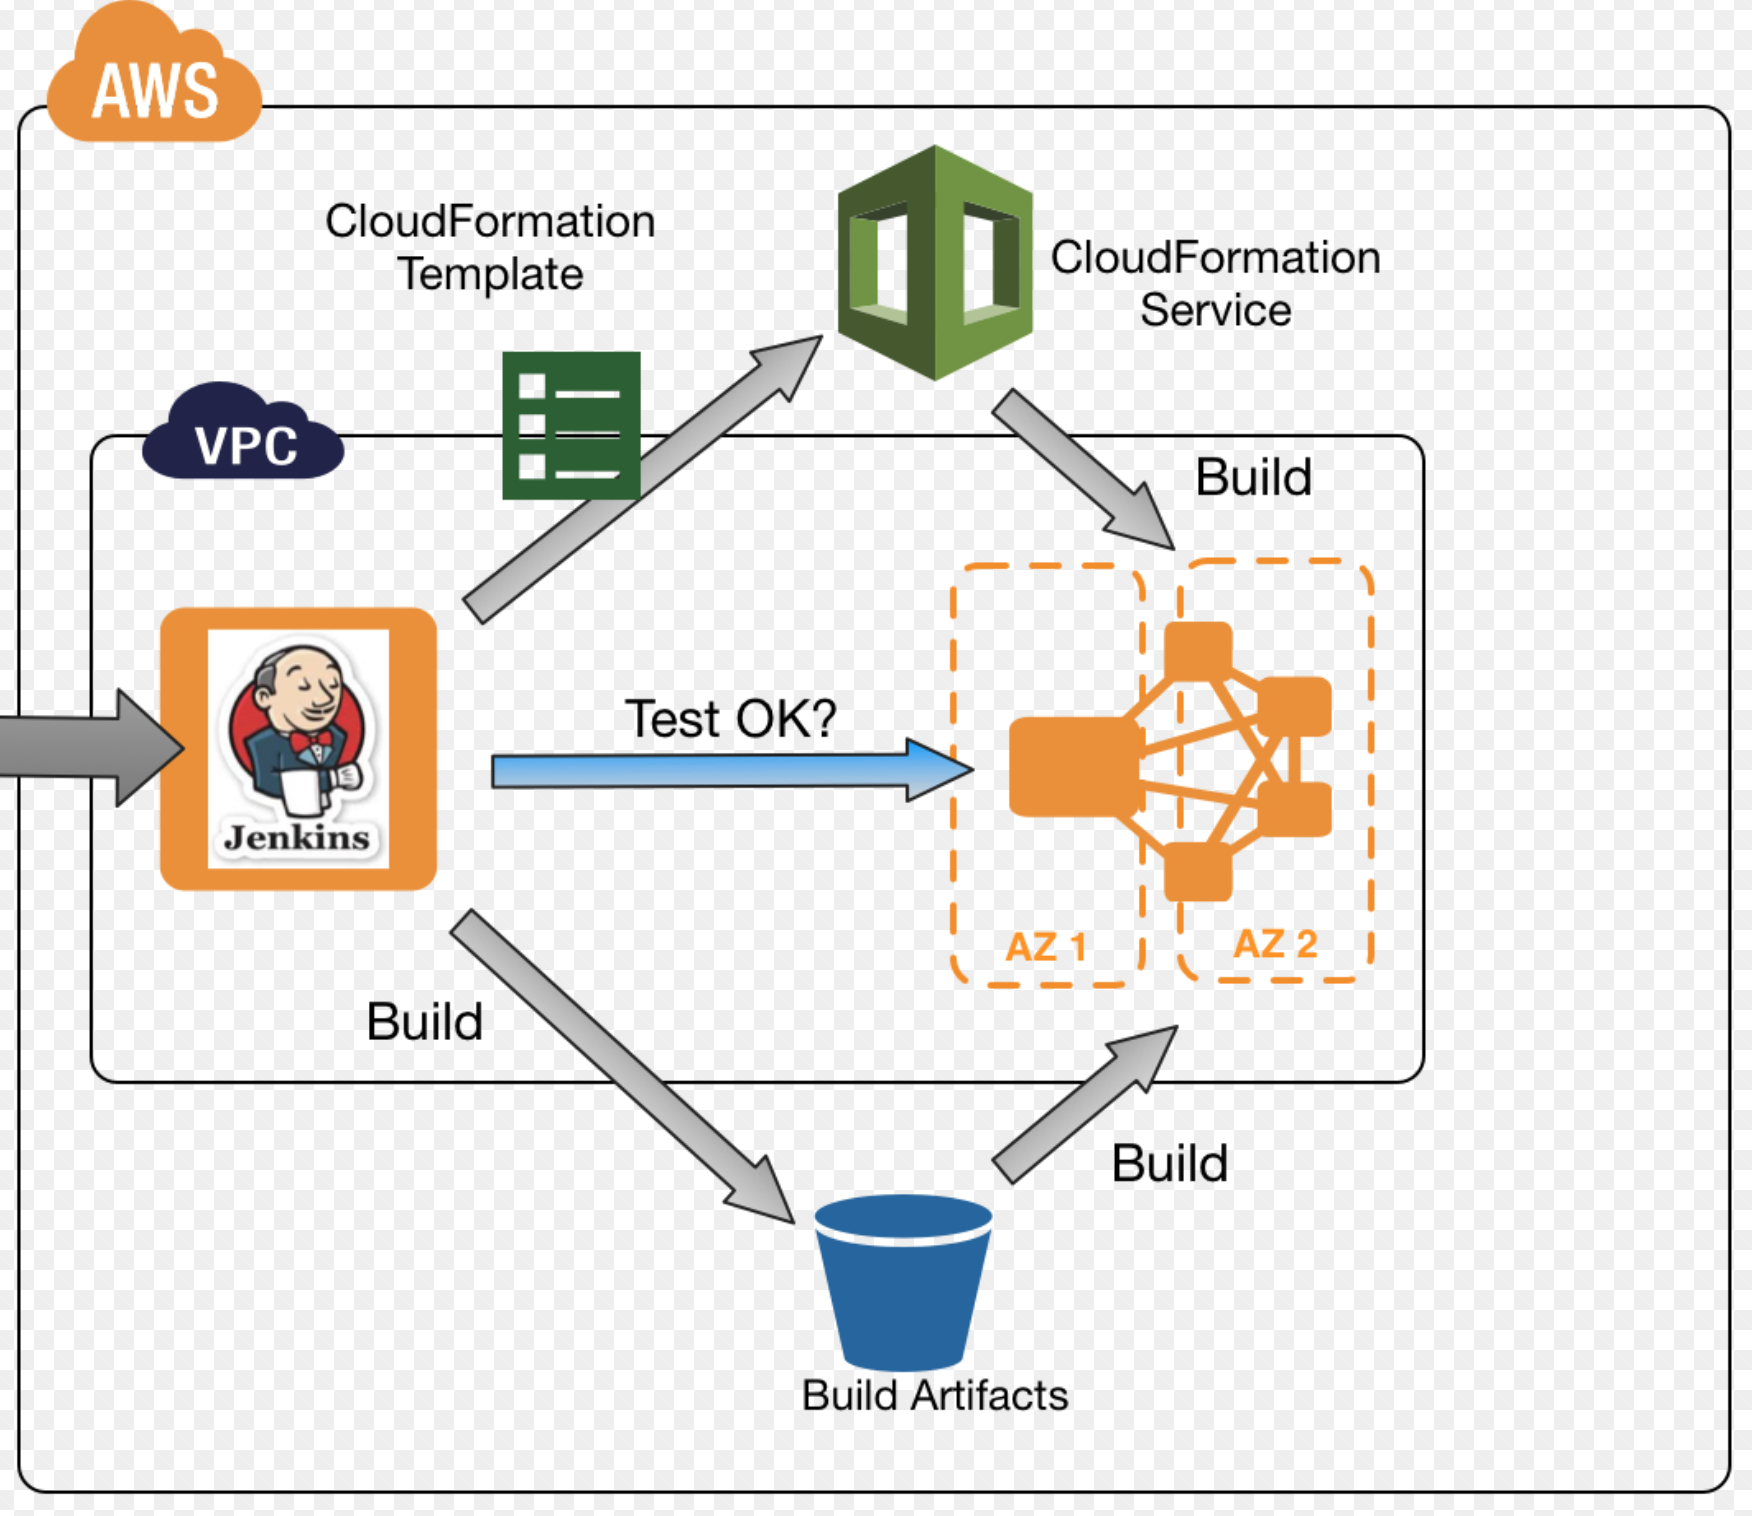
I stumbled upon CloudFormation that allow us to handle infrastructure as code. Instead of setting up their environments and applications by hand, they build a template and use it to create all of the necessary resources, collectively known as a CloudFormation stack. This model removes opportunities for manual error, increases efficiency, and ensures consistent configurations over time. We can configure everything we need in AWS like VPC, EIP (Elastic IPs), ELB(Elastic Load Balancers), EC2 instances and anything in the AWS universe and beyond. The only thing you need is define your CloudFormation template in JSON and create a stack. You can either use Cloudformation console or using AWS cli tools.
At the same time we tackled this drastic change, the team took opportunity to improve other few things.
- We decided to use a new separate Oracle RDS instance that would be used exclusively for automation testing
- We improve our Cucumber execution test to add “post” execution steps that will wipe out the tables after execution of each scenario.
What if we could launch our automated acceptance tests against an independent EC2 instance with everything we need on demand? Now EC2 bill us by second, so the economic benefits are obvious as we would only pay for the time the EC2 instance is used for that purpose. On top of that, our development team can work smoothly in our development environment without being impacted by the execution of the acceptance tests.
Now we can schedule EC2 shutdown in non-business timetable and execute on demand (or nightly) Our monthly bill will be now half of the costs we had in the past!
A high level description of the process would be:
- Create a new CloudFormation stack that will imply EC2, EIP, VPC, networks, etc.
- Obtain the EC2 IP address
- Run the automation tests against this instance
- Delete the CloudFormation stack.
The challenges here is that the ephemeral EC2 instance MUST have all our artifacts, ideally latest version and identical to our development environment. Luckily enough we took the decision a while ago to use docker images, so it should not that hard to reach that state.
The following guide summarize the steps to follow. It’s not intended to be a detailed walk through, I guess you can get the idea
1. Install the CloudFormation plugin in your jenkins server.
The following CloudFormation Jenkins plugin worked like a charm.
You can update Jenkins via the plugins page, just search for CloudFormation , install it. Jenkins restart is not necessary.
2. Define a cloudFormation template.
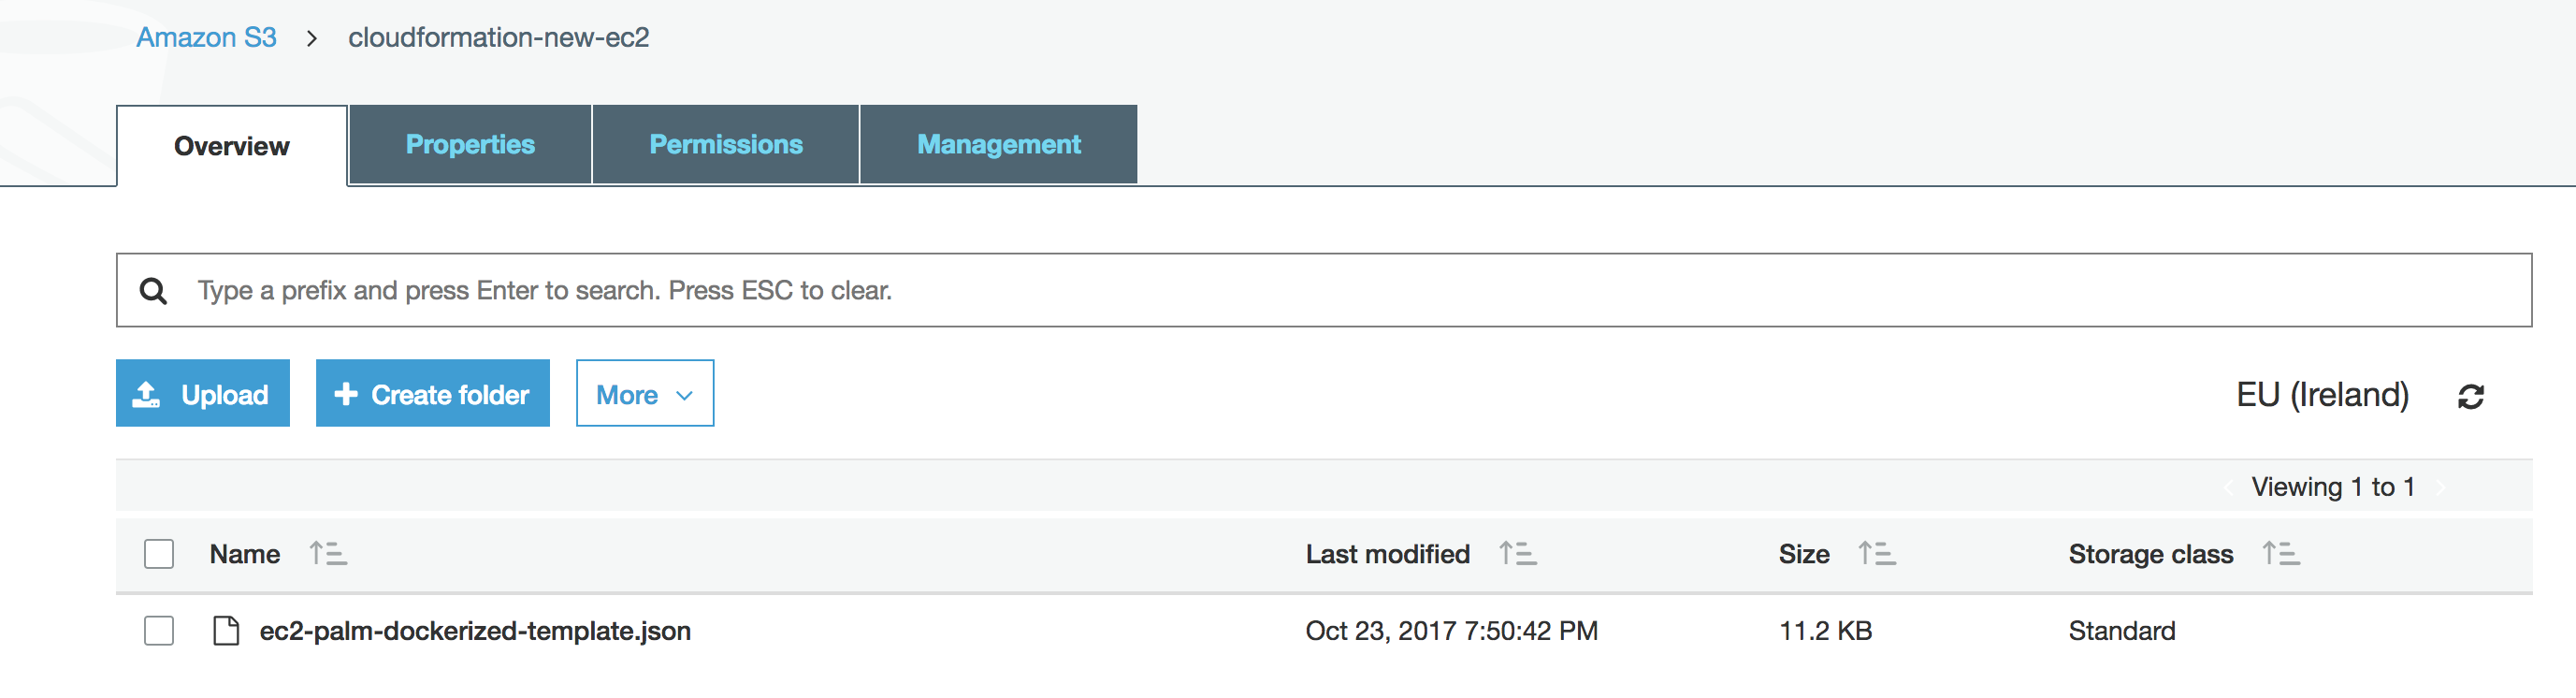
I used as reference one of the examples templates to create an EC2 instance. There are many snippets at CloudFormation templates I created a new S3 bucket to organize out templates. We uploaded it to S3 so later we can refer to it just using its S3 URL.
The templates allow configuration parameters that determine for example which EC2 instance type will be used, the key-pairs to provide ssh access to the EC2 instance and any paremeter that you may need to make your template. There is also a graphical designer that enable create your infrastructure diagram with drag and drop components. CloudFormation itself is complex enough to spend a whole book on that, so we are just scratching the surface here.
3. Obtain AWS keys and Secrets
If you have already used AWS-cli probably you have this already. Otherwise you need to create them, and keep them safe because internally the API used by the Jenkins plugin requires that information. AWS Console will not allow you to retrieve the keys and secrets so keep them safe!
4. Configure a freestyle Jenkins job. See below my settings (hiding credentials!)
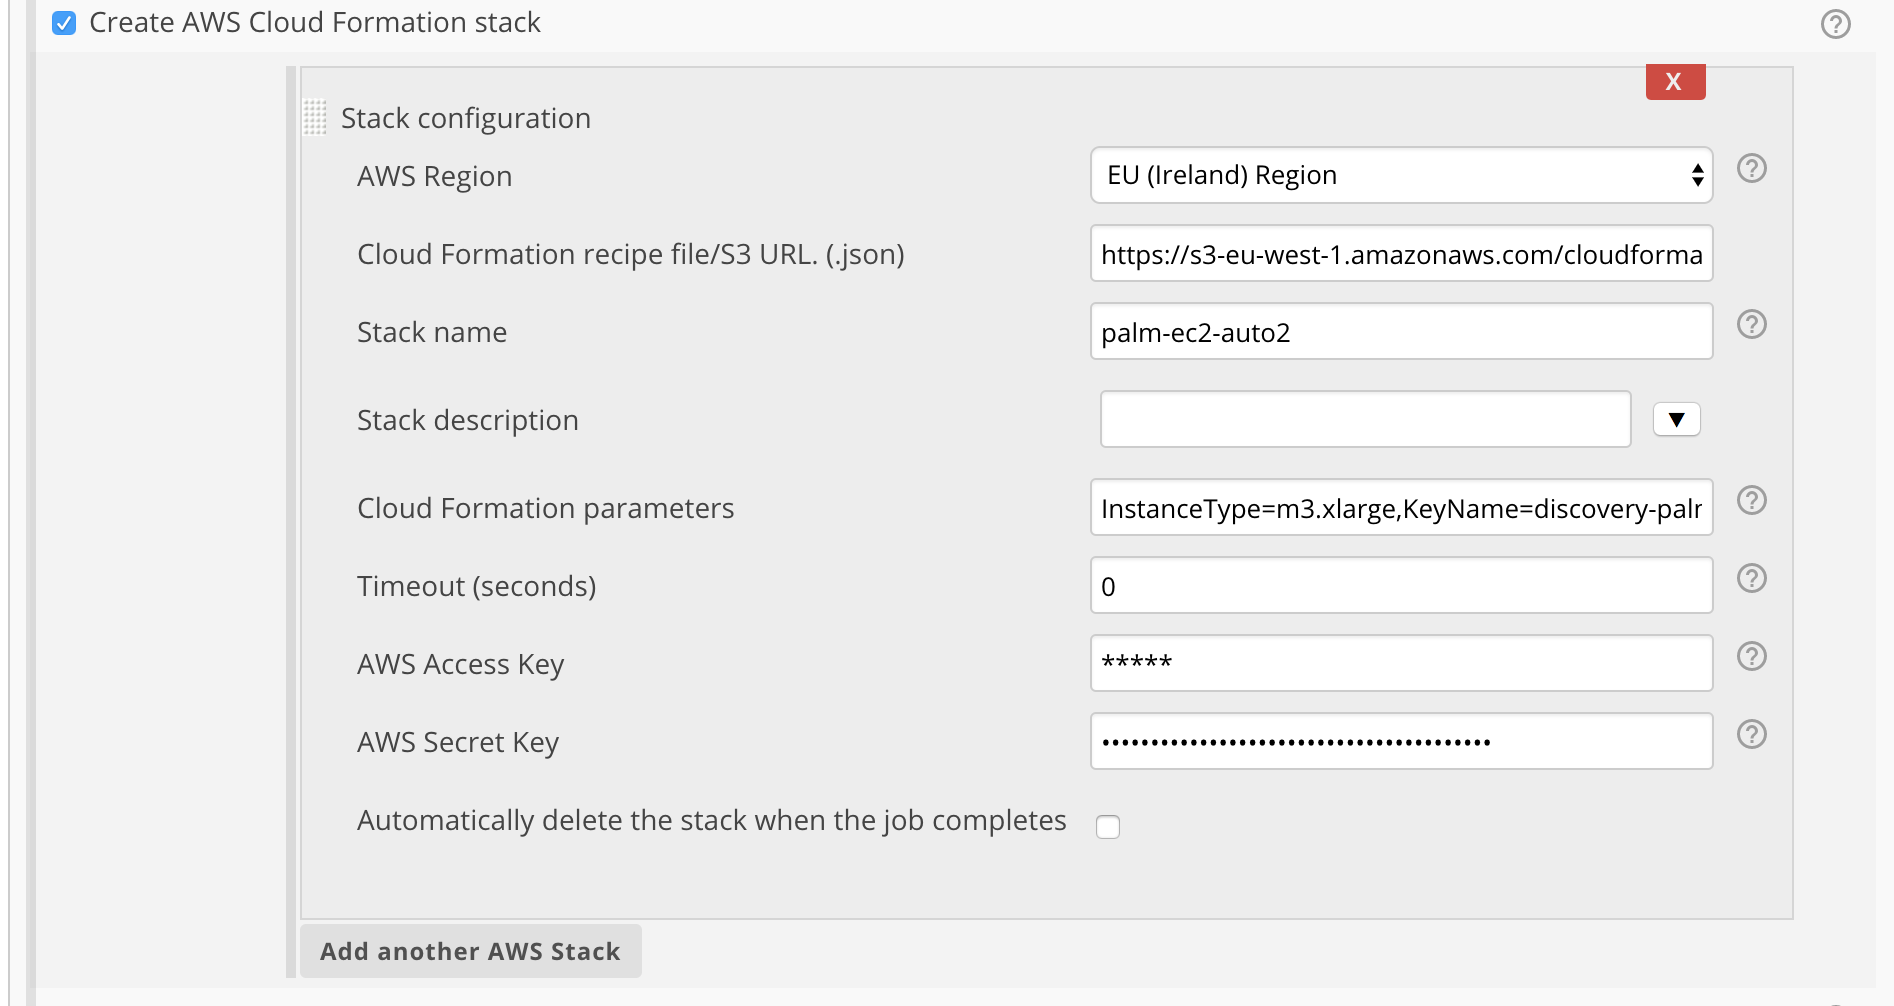
Important tip: Here is worthy mentioning that the region you chose must be exactly the same where your AWS key pairs were created. Note: Name of the stack is automation.
5. Execute your Jenkins job
Be aware that all these tests imply the creation of EC2 instances. If you forget to remove them, your wallet may suffer and you will have to pay some dollars at the end of the month.
So now I have a shiny new EC2 instance….. but is nearly empty!
.. so the next step was figuring out the easiest way to install everything that would allow me to spin up the same containers with the latest code. My idea was having a fresh EC2 instance and find a way that CloudFormation would allow me to run a shell script to pull of the configuration and docker images so we can run them.
What did i need at least
- SVN/Git client
- Docker client
- get based scripts that handle retrieval of properties, and execution of docker containers
- change permissions directories and file ownership
- execute everything … pray
The approach seemed a bit complex.. so time to rethink..
At our existing CI process, we use the Jenkins pipeline plugin, that builds and push images to our Docker registry. Then ssh to our development machine in order to pull the images with a specific tag from the docker registry and restart all the containers. In summary all the bits and pieces were already there, was just a matter of wiring them together slightly different!
So I took the easiest path (lazy mode some times work for me!)
- Create AMI from our AWS EC2 development machine
- Obtain its Amazon ID
-
Modify again our JSON Cloudformation template, so for the region “eu-west-1” I associated my AMI ID. Do not forget to upload to S3
The section within the template is
    "Mappings" : {
    "RegionMap" : {
      "eu-west-1"      : { "AMI" : "ami-b0e43fc9" }
    }
  }
- Modify the UserData section to look like. UserData allow us to launch any sequence of commands during EC2 startup. Eventually an event is triggered in order to notify the end of the process, so the process of creation of the stack is fully completed.
  "UserData"       : { "Fn::Base64" : { "Fn::Join" : ["", [
          "#!/bin/bash\n",
          "yum update -y aws-cfn-bootstrap\n",
          "cd /home/ec2-user/docker\n",
          "/home/ec2-user/docker/deploy_all.sh trunk development\n",
          "/opt/aws/bin/cfn-signal -e 0 -r \"WebServer setup complete\" '", { "Ref" : "WebServerWaitHandle" }, "'\n"
        ]]}}
6. Integrate with our Jenkins automation suite test job
We added an extra build step, so now we create ephemeral EC2 instance with every container up&running so we can hammer our test suite against it. However there are still some challenges to be solved…
We needed the IP address of the new EC2 instance and will be different every execution! Cloudformation enable exposing output variables after the execution. There are predefined functions we can use that give us access to properties of the AWS Objects that we create during the process.. The following snippet shows how we declare a variable PublicIp that will get its value from the PublicIp property of the object WebServerInstance.
"Outputs" : {
    "PublicIp" : {
      "Value" : { "Fn::Join" : [ "", ["", { "Fn::GetAtt" : ["WebServerInstance", "PublicIp"] }]]},
      "Description" : "EC2 Public IP"
    }
  }
However still cannot access to it. Several tests using environment shell showed me the variable was not even existing :(
Browsing the Github Source code for CloudFormation Jenkins plugin (CloudFormationBuildWrapper.java) I found out that for every output variable, it creates a environment variable.
try {
	if (cloudFormation.create()) {
		cloudFormations.add(cloudFormation);
    /* HERE!!!*/
		env.putAll(cloudFormation.getOutputs());
	} else {
		build.setResult(Result.FAILURE);
		success = false;
		break;
	}
} catch (TimeoutException e) {
	listener.getLogger()
			.append("ERROR creating stack with name "
					+ stackBean.getStackName()
					+ ". Operation timedout. Try increasing the timeout period in your stack configuration.");
	build.setResult(Result.FAILURE);
	success = false;
	break;
}
The class CloudFormation.java is responsible of creating the output variable as environment variable following a convention
stackName_outputvariablename
In our case assuming our stack name was “automation” it will expose a variable named “automation_PublicIp” Last step was straight forward, using that variable we pass it as an argument to Cucumber to indicate which is the machine were all the scenarios should be run.
We do that using Execute Shell build step
#!/bin/bash
export PATH="$PATH:$HOME/.rvm/bin"
export LD_LIBRARY_PATH=/usr/lib/oracle/12.2/client64/lib
[[ -s "$HOME/.rvm/scripts/rvm" ]] && source "$HOME/.rvm/scripts/rvm"
rvm use "ruby@gemset"
#set -e
bundle install
bundle exec cucumber PALM_HOST=${automation_PublicIp} TARGET_ENV=aws-automation PALM_CLEAN=true --tags=@regression -f pretty -f json -o cucumber.json
7. Delete everything
Once the suite has been run , the same AWS ClouFormation plugin offer us a post build step in order to remove the CloudFormation stack. You can wipe out a CloudFormation stack if you provide the stack name
A few bumps on the road
I will mention here some of the “gotchas” faced while running the whole process.
I struggled a lot initially, just starting the whole process to create the EC2 instance. While all the components were created correctly, once the last step was reached I got a message saying that my key-pairs did not exist. The bottom of the issue was related with the Region itself. Our key-pairs are associated to a region and when we create a Cloudformation stack we must specify the region. It both regions do not match, you will have a hard time figuring out what is going on.
Next issue was with a silly limit associated with the maximun number of elastic ips (EIP). We already have allocated 5 EIPs so I had to deallocate some of the non-used ones.
During creation of the Cloudformation stack, any of the above errors would lead to a status of ROLLBACK_COMPLETED. In that case you need to delete the stack itself manually otherwise the plugin will not work, because the plugin will try to update an existing stack with a non recoverable state. Other alternative is that in the plugin configuration you change the name of your stack so there are no conflicts with existing ones.